This is the first part from a series of articles that will show you how to build a 3D board game that will run in a modern browser.
Checkers is the game that will be used to demonstrate the browser’s 3D capabilities. To find out more about the game go here.
Some notes before starting:
- This and the following articles will not show you how to build a complete checkers game, but instead will show you only the basics because the focus will be on the actual 3D rendering.
- The 3D assets needed will be provided to you and there is no info on how to create them other than some basic guidelines specific to our goal.
What you’ll learn in this part
This article will cover the basic setup of the game, like directory structure and needed files. In the end you’ll have a wireframe cube and you’ll be able to orbit around it. You can scroll down at the end of the article if you want to see it in all its glory.
Now let’s clarify some things.
What is WebGL?
Let’s see what Wikipedia has to say:
WebGL (Web Graphics Library) is a JavaScript API for rendering interactive 3D graphics and 2D graphics within any compatible web browser without the use of plug-ins. WebGL is integrated completely into all the web standards of the browser allowing GPU accelerated usage of physics and image processing and effects as part of the web page canvas.
That pretty much says it all. To find out more you can read the full description here.
To test if your browser and graphics card supports WebGL go to get.webgl.org. It should tell you that “Your browser supports WebGL” and you should see a spinning cube.
The only browsers that currently support WebGL out of the box are Mozilla Firefox and Google Chrome. Safari and Opera have implemented support for WebGL also, but it’s disabled by default.
What is Three.js?
Three.js is a JavaScript 3D library that takes away the complexity of WebGL low-level API. Here’s an official description:
The aim of the project is to create a lightweight 3D library with a very low level of complexity — in other words, for dummies. The library provides <canvas>, <svg>, CSS3D and WebGL renderers.
We will be using this library to build our 3D board game.
Before we begin
You should be familiar with the following concepts in JavaScript:
Self-Invoking Anonymous Function
You may also want to read about ECMAScript 5 new features:
ECMAScript 5 Objects and Properties
ECMAScript 5 Strict Mode, JSON, and More
About testing
Because the 3D assets will be loaded via AJAX, opening the index.html file in the browser will only work in Firefox.
In Google Chrome you’ll see the following error message in Developer tools console: “Cross origin requests are only supported for HTTP”. To fix that you either use a local web server to access the project or you open Google Chrome with the --disable-web-security argument (Disable same origin policy).
The beginining
Create a directory for our game and make it to reassemble the following structure:
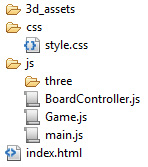
3d_assets/: the directory where the 3D content files will resides.
css/style.css: some basic CSS styles.
html, body {
    height: 100%;
}

body {
    margin: 0;
    overflow: hidden;
}

#boardContainer {
    width: 100%;
    height: 100%;
    background: #e6e0cf;
}
js/three/: the three.js library home.
js/main.js: the checkers game will start from here.
js/Game.js: it will handle game logic and it will create a BoardController.
js/BoardController.js: it will handle all the actual drawing and mouse interaction.
index.html:
<!DOCTYPE html>
<html>
    <head>
        <link rel="stylesheet" type="text/css" href="css/style.css" />
    </head>
    <body>
        <div id="boardContainer"></div>

        <script src="js/three/three.js"></script>
        <script src="js/three/OrbitControls.js"></script>
        <script src="js/Game.js"></script>
        <script src="js/BoardController.js"></script>
        <script src="js/main.js"></script>
    </body>
</html>
Download three.js library and copy into js/three/ the following files: build/three.js and examples/js/controls/OrbitControls.js.
Starting the game
Our game will be started from main.js:
(function () {
    'use strict';

    var game = new CHECKERS.Game({
        // The DOM element in which the drawing will happen.
        containerEl: document.getElementById('boardContainer'),

        // The base URL from where the BoardController will load its data.
        assetsUrl: '3d_assets/'
    });

})();
The Game object will be placed in the CHECKERS namespace and it will automatically start a new game on instantiation. The properties passed to the configuration object will be passed to BoardController‘s instantiation also.
Let’s have a look at Game.js:
var CHECKERS = {};

CHECKERS.Game = function (options) {
    'use strict';

    options = options || {};

    var boardController = null;

    function init() {
        boardController = new CHECKERS.BoardController({
            containerEl: options.containerEl,
            assetsUrl: options.assetsUrl
        });

        boardController.drawBoard();
    }

    init();
};
On line 8 we define a private property that will holds the BoardController instance. On line 10 the init function is defined and on line 19 the same function is called.
Note: The init function should be kept always at the bottom.
The job of the init function is to create an instance of BoardController and to request the board drawing at line 16.
Let’s move on to BoardController.js:
CHECKERS.BoardController = function (options) {
    'use strict';

    options = options || {};

    var containerEl = options.containerEl || null;

    var assetsUrl = options.assetsUrl || '';

    this.drawBoard = function () {
        console.log('drawBoard');
    };
};
Load/reload the index.html file in the browser and you should see the word ‘drawBoard’ printed in the browser’s console.
Creating the 3D virtual space
The rest of the article will add code to BoardController.js file.
Before drawing some actual 3D elements we need to create the WebGL renderer, a scene that will hold the 3D objects, a camera and a camera controller that will allow the mouse to control the camera position.
First let’s declare the needed variables:
assetsUrl: options.assetsUrl || '';

var renderer;
var scene;
var camera;
var cameraController;
We will initialize the variables in a function named initEngine called from drawBoard:
this.drawBoard = function () {
    initEngine();
};

function initEngine() {
    var viewWidth = containerEl.offsetWidth;
    var viewHeight = containerEl.offsetHeight;

    // instantiate the WebGL Renderer
    renderer = new THREE.WebGLRenderer({
        antialias: true
    });
    renderer.setSize(viewWidth, viewHeight);

    // create the scene
    scene = new THREE.Scene();

    // create camera
    camera = new THREE.PerspectiveCamera(35, viewWidth / viewHeight, 1, 1000);
    camera.position.set(0, 120, 150);
    cameraController = new THREE.OrbitControls(camera, containerEl);
    //
    scene.add(camera);

    containerEl.appendChild(renderer.domElement);
}
The code should be pretty self-explanatory. To see what all those arguments passed to the PerspectiveCamera creation on line 19 means, have a look at the documentation.
All objects added to the scene will be positioned in the center, so on line 20 we move the camera up and towards us. On line 21 the camera controller is created by passing to the constructor the camera and the element that will listen for mouse events.
Drawing 3D objects
With the virtual world created now we are ready to add some 3D objects in it. That will be accomplished in a initObjects function added below the initEngine:
function initObjects(callback) {
    var cube = new THREE.Mesh(new THREE.CubeGeometry(50, 50, 50));
    scene.add(cube);

    callback();
}
The first thing to notice is that the function will accept a callback that is called at the end. For now only a cube is created and added to the scene on line 2 and 3, but later on the checkers board and the pieces will be loaded via AJAX and we’ll want to know when everything have been loaded.
The initObjects function should be be called from drawBoard after initEngine like this:
initObjects(function () {
    onAnimationFrame();
});
After the objects have been loaded we need to tell the WebGL renderer to render the scene on each animation frame.
The render loop.
After the initObjects function add the following:
function onAnimationFrame() {
    requestAnimationFrame(onAnimationFrame);

    cameraController.update();

    renderer.render(scene, camera);
}
On line 2 an animation frame is requested (info about requestAnimationFrame).
The camera controller needs to be updated on each frame, so we do that on line 4.
On line 6 the scene is getting rendered.
Now if you test in the browser you should see a wireframe cube:

Your cube may look different since the colors of the lines are changing randomly with each refresh.
You can orbit around with left mouse button down and drag. To zoom use the mouse scroll and to pan drag with the right mouse button.
End of part 1
That’s all folks! In the next article we will load the checkers board and the pieces; we’ll also add some lights in scene.
You can download the current phase of the project from here.
If you have questions, suggestions or improvements don’t hesitate to add a comment and let me know about them.
If you liked this post
you can buy me a beer


