In this article we will implement a chat application for mobile devices that will work on both Android and iOS. In order to do so, we will need knowledge of Sencha Touch for the mobile application, Node.js for server-side and MySQL for the database. We can use this kind of application to communicate with other people needing only a smartphone and an internet connection.
What we want from this application?
We want an application that allows us to communicate in real time with other users, with a login, so we can have our own account. We also want the messages to be saved somewhere, so we can view them anytime we want.
How we structure the data?
In order achieve these objectives , first of all we need to think about how we structure the data For our sample there are going to be two data types, for users and messages.
For the user data type, we will need 3 fields: a user id, that will be unique and will help us identify a specific user, a username used for display and a password that is required in order to authenticate the user.
For the message data type we will need a message id, unique for each message, similar to the user id. Also we need the id of the user that sent the message and the id of the user that received it, the message content, and the message status that will mark if the message was read or not.
The database
In order to save the data that we described earlier, we will create these two tables in MySQL:
The users table:
CREATE TABLE IF NOT EXISTS `bc_users` (
    `user_id` int(10) unsigned NOT NULL AUTO_INCREMENT,
    `user_username` varchar(100) NOT NULL,
    `user_password` varchar(37) NOT NULL,
    PRIMARY KEY (`user_id`)
);
The messages table:
CREATE TABLE IF NOT EXISTS `bc_messages` (
    `message_id` int(10) unsigned NOT NULL AUTO_INCREMENT,
    `message_from` int(10) unsigned NOT NULL,
    `message_to` int(10) unsigned NOT NULL,
    `message_content` text NOT NULL,
    `message_read` tinyint(3) unsigned NOT NULL DEFAULT '0',
    PRIMARY KEY (`message_id`)
);
The server-side
This part will be developed using Node.js. Assuming that you have some knowledge about this, we will start with the implementation. First we are going to write some helpers that will provide the functions that we need in order to interact with the database.
We will use a Node.js driver for database, named db-mysql. Now, create a file named db.js, where we will require the driver, create the sql connection and connect to the sql server. This will look like this:
var mysql = require('db-mysql');
var config = require('./../config');

//create a new connection object
var sql_connection = new mysql.Database({
    hostname: config.dbConfig.host,
    user: config.dbConfig.user,
    password: config.dbConfig.password,
    database: config.dbConfig.database
});

//connect to db
sql_connection.connect(function(error) {
    if (error) {
        console.log('An error ocurred when connecting to database ' + error);
        process.exit();
    }
});

exports.connection = sql_connection;
Here we create the connection object, with the database credentials. After that we call the connect method of this object, with a callback function. If there is any error, we display it and stop the process. In the end, we add to the MySQL object the connection property, which is the database connection.
Also we will need a helper for working with user passwords. For safety reasons we won’t save them exactly how the user writes them. For this, we choose the following algorithm: we generate a random string, five letters long. We add this string at the end of the user password, we call the MD5 hash function over this string, and finally, add the same random string at the beginning of the result. Please note that this approach is used for a mix of security but also simplicity since this is a tutorial. In “real world” applications you might want to use more advanced hashing algorithms and strategies. Assuming that randomString(5) is a function call that returns a 5 chars random string, the function described will look like this:
//crypt the password with the specified salt or a new one
var cryptPassword = function(password, salt) {
    var randString = salt || randomString(config.saltLength);

    return randString + crypto.createHash('md5').update(password + randString).digest('hex');
};
After we create all helper functions that we need, we include all helpers in the main server file. Here we will create the HTTP server, like this:
//create the server
var server = http.createServer(function(request, response) {
    request.on('end', function() {
        response.writeHead(200, {'Content-Type': 'text/html'});
        response.end();
    });
}).listen(8081);

var conn = io.listen(server);
We will also need to keep track of connected users. So we will create two objects: clients and sockets. In clients objects we will store the connected user info, at the socket id key. In the sockets object, we will store the socket object at the user id key. After that, we will need to handle the following events: register for user register, login and auto_login for user authentication, get_users to get a full list of online users, message_sent triggered when sending a message, message_read for marking messages as read, get_conv_messages to load older messages, disconnect and logout for user disconnect event.
We will see for example, the message_sent event handler:
//message sent event
socket.on('message_sent', function(message_to, message_content) {
    //get user id of sender
    message_from = clients[socket.id].user_id;
    //save the message to db and get the id
    var message_id = messages.save_message(message_from, message_to, message_content);

    //if there is a socket to send to
    if (sockets[message_to]) {
        //send the message
        sockets[message_to].emit('message_receive', message_from, message_content, message_id);
    }
});
In this handler, first, we get the user id from clients object, based on the id of the clients socket. We save the message to database and receive the new message id. Finally, if the recipient is connected (if the user id key exists in sockets object), we emit the new message to recipient socket.
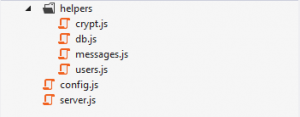
In the end, our Node.js application will have the following file structure:
The client-side
For the client side we will use the Sencha Touch framework. Assuming that you already have base knowledge about Sencha Touch and MVC, we will present only some aspects of the application.
As we already know, we have two data types: the user and the message. In the client application we will have message and online user. We will create a model for each one of them, that will look like the following:
Ext.define('App.model.Message', {
    extend: 'Ext.data.Model',

    config: {
        fields: [
             //content of message
             {name: 'message_content', type: 'string'},
             //if true, message sent, if false, message received
             {name: 'sent', type: 'boolean'},
             //other user of conversation
             {name: 'message_with', type: 'int'},
             //date of message
             {name: 'message_time', type: 'string'},
             //0 if message unread, 1 if read
             {name: 'message_read', type: 'int'},
             //the id from db of the message
             {name: 'message_id', type: 'int', defaultValue: 0}
        ]
    }
});
Here we define the Message model, every message following to be a instance of this class. We define the message_content field, which will represent the actual message, the sent boolean, that will be true if the message was sent from this device, or false if it was received on this device. The message_with represents the id of the other user that received or sent the message, message_time is the timestamp of the message. The last are: the message_read, which will be 0 if the message is not read or 1 if the message is read, and message_id that represents the id of the message from the database.
For this model, we will also create a store, where we can have a collection of Message objects. We will name the store Messages, and the definition will look like this:
Ext.define('App.store.Messages', {
    extend: 'Ext.data.Store',

    config: {
        model: 'App.model.Message'
    }

});
Now, we must add Node.js functionality to our app. First, we include the js file from our server in the HTML header:
<head>
    <title>Chat</title>
    <link rel="stylesheet" type="text/css" href="css/app.css" />

    <script type="text/javascript" charset="utf-8" src="js/lib/sencha-touch-all.js"></script>
    <script src="http://<IP>:<PORT>/socket.io/lib/socket.io.js"></script>
    <script src="js/app.js"></script>
</head>
After that, we try to create the socket object:
if ("undefined" == typeof(io)) {
    alert("Server not available at this moment. Please retry later");
} else {
    var socket = io.connect('<IP>:<PORT>');
}
We will create a register and login screen, so users can sign up an then authenticate in the application. After login, we will save user id and user name in local storage, so we can auto login user next time he uses the application. However, this is not a safe procedure and it’s not recommended to use it in production.
After login, we will display a screen with the online users. This is a List view, that loads its data from OnlineUsers store created earlier. The controller of this view listens to list refresh, list add and list remove events, so we can keep it up to date in real time. Also, when a new message is received but the user did not see it, the list will update the senders item with the number of unread messages from that user.
Tapping on a user from this list, will open the conversation view. Here we can see the messages from this user, send a new message, or scroll up to load older messages. The display of the messages is also a list that loads the data form Messages store. This list looks like this:
//messages list
{
    xtype: 'list',
    disableSelection: true,
    store: 'Messages',
    itemId: 'messageList',
    layout: 'fit',
    cls: 'messageList',
    itemTpl: new Ext.XTemplate(
        '<tpl if="sent">',
            '<div class="x-button x-button-confirm sent message-container" style="float: right;">',
                '<p class="x-button-label message">{message_content}</p>',
            '</div>',
        '<tpl else>',
            '<div class="x-button received message-container" style="float: left;">',
                '<p class="x-button-label message">{message_content}</p>',
            '</div>',
        '</tpl>'
    )
}
In order to load older messages, we must attach a handler for the scroll event of the scroller of list. If it reaches a specified value for Y coordinate, it’s time to load more older messages.
var listItem = view.query('#messageList')[0];
//handler for list scroll
listItem.getScrollable()._scroller.on('scroll', function() {
        //if the scroll reaches a point and there was not another request made
        if (-30 >= arguments[2] && !that.loadMoreRequest) {
        //request more messages
        that.loadMoreRequest = true;
        socket.emit('get_conv_messages', that.selectedUser, store.getCount(), 10);
    }
});
On first line, we get the list element. After that we get the scroller object, and we attach a handler for it’s scroll event. If the Y coordinate get’s lower than -30, and a load more request was not already made, we mark the load more request flag as true, and we make the request to get the next 10 elements. The server will respond to this request with the messages, and trigger the get_conv_message_resp event. In the init function of the Chat controller, we attach a handler for this event. In this handler we will parse the JSON received and after that, one by one, we will insert the messages at the beginning of the store, so the older one is always the first. Finally, with a delay of 1 second, we will set as false the load more request flag, so we can make another request if the user wants.
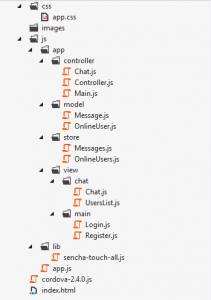
Finally, the file structure of our client application should look like this:
Now you are one step away from your mobile chat app. Last thing you need to do is to make iOS and Android builds in order to see it at work. You can download the full archive and give it a try.
I am looking forward for your feedback, let me know if you have any suggestions or questions.


